• Sign Up! To view all forums and unlock additional cool features

    Welcome to the #1 Dodge, Jeep and RAM Forum dedicated to FCA owners and enthusiasts. Register for an account, it's free and it's easy, so don't hesitate to join the SRT Forum today!


Wheel stud replacement

Hpindy

4000 Posts Club
Founding Member
9 Second Best E/T
HFCOTM
Member ID
#974
Messages
4,869
Reactions
11,001
Likes
302
City
Jackson's Point
State
Non-US
Country
Canada
Vehicle
2018 challenger hellcat
#41
Which lug nuts did you get?
I got these


Sent from my BBF100-2 using Tapatalk


Frenchcat

Member
Founding Member
Member ID
#1143
Messages
87
Reactions
396
Likes
27
City
t-r
State
Non-US
Country
Canada
#42
THANK YOU!!

I think I found the stud that will work for my needs. From left to right is Doorman stock replacement 610-502 at 50 mm stud length
Doorman 610-435 with is about 8 mm longer then stock
Doorman 610-509 which is about 25 mm longer then stock
And ARP stud which is about 45 mm longer then stock but knurl pilot is not present
Going to be using the 610-435
View attachment 8652 View attachment 8653 View attachment 8654

Please do you have part # of the ARP stud on those pictures?


Hpindy

4000 Posts Club
Founding Member
9 Second Best E/T
HFCOTM
Member ID
#974
Messages
4,869
Reactions
11,001
Likes
302
City
Jackson's Point
State
Non-US
Country
Canada
Vehicle
2018 challenger hellcat
#43
Please do you have part # of the ARP stud on those pictures?
Here you go


Sent from my BBF100-2 using Tapatalk


Frenchcat

Member
Founding Member
Member ID
#1143
Messages
87
Reactions
396
Likes
27
City
t-r
State
Non-US
Country
Canada
#44
Thanks @Hpindy ! Correct me if I'm wrong, those Arp studs are listed 0.50 " longer than our OEM one's but with the ball nose, they are 1.00" longer over all?


Hpindy

4000 Posts Club
Founding Member
9 Second Best E/T
HFCOTM
Member ID
#974
Messages
4,869
Reactions
11,001
Likes
302
City
Jackson's Point
State
Non-US
Country
Canada
Vehicle
2018 challenger hellcat
#45
Thanks @Hpindy ! Correct me if I'm wrong, those Arp studs are listed 0.50 " longer than our OEM one's but with the ball nose, they are 1.00" longer over all?
I would have to measure them . But that sounds about right . I have them on my car .

Sent from my BBF100-2 using Tapatalk


OP
16GoManGoHC2

16GoManGoHC2

3000 Posts Club
Founding Member
9 Second Best E/T
Member ID
#1139
Messages
3,286
Reactions
7,767
Likes
252
City
Nanticoke
State
PA
Country
United States
Vehicle
2016 Challenger He’ll Cat
Thread Starter #46
Installed new DSS Stage 5 axles yesterday along with changing the studs. They don’t come out without removing the hub as some have suggested. Also, the Bolt heads that hold the hub on have a goofy head on them requiring a special E12 socket. The harbor freight ball joint splitter worked GREAT getting the old studs out, recommend tool for $20 it worked great. I ended up using the ARP studs cut to 64 mm under the head which gave me full engagement using a 12 mm spacer on the Racestars and when putting the stock 20’s back on without the spacer original lug nuts had 2 turns left before bottoming.
What a job the first one was, since hub was off puled the E brake shoes off to cleaning things up and learned the hard way the lower alum shoe retaining pin has to go back in BEFORE putting the plate and hub back on, there’s no getting it in after assembly like the top one :(
But now ready for testing :)
8D164D24-788A-46EF-A6C7-4D1576C330C5.jpeg CBA07E90-AB19-4CD9-990E-196919BC93AD.jpeg 04807B91-A403-4FA4-8BBC-C5A79F35AF76.jpeg C7E8B550-466F-445B-9D8F-429C653D6FC4.jpeg 5BBD72F6-AFA3-4695-9423-2EA5DB9569F3.jpeg D8209863-8F73-447C-98B0-4A7E21723478.jpeg 21B9BDC4-4AED-4501-86A3-84551D195AC9.jpeg BD3FB916-D416-437A-BF8C-8768AA511161.jpeg 8F78A3B9-3524-4099-BA96-AA7FD1A4D295.jpeg 3801F802-CCE5-4EEE-A256-46CE7A9668EE.jpeg D14E3FED-38B2-45D4-ADB3-36915FF55B6B.jpeg


Hpindy

4000 Posts Club
Founding Member
9 Second Best E/T
HFCOTM
Member ID
#974
Messages
4,869
Reactions
11,001
Likes
302
City
Jackson's Point
State
Non-US
Country
Canada
Vehicle
2018 challenger hellcat
#47
Installed new DSS Stage 5 axles yesterday along with changing the studs. They don’t come out without removing the hub as some have suggested. Also, the Bolt heads that hold the hub on have a goofy head on them requiring a special E12 socket. The harbor freight ball joint splitter worked GREAT getting the old studs out, recommend tool for $20 it worked great. I ended up using the ARP studs cut to 64 mm under the head which gave me full engagement using a 12 mm spacer on the Racestars and when putting the stock 20’s back on without the spacer original lug nuts had 2 turns left before bottoming.
What a job the first one was, since hub was off puled the E brake shoes off to cleaning things up and learned the hard way the lower alum shoe retaining pin has to go back in BEFORE putting the plate and hub back on, there’s no getting it in after assembly like the top one :(
But now ready for testing :)
View attachment 9026 View attachment 9027 View attachment 9028 View attachment 9029 View attachment 9030 View attachment 9031 View attachment 9032 View attachment 9033 View attachment 9034 View attachment 9035 View attachment 9036
You are correct on the removal/installation of the studs on the rear . I had a brain fart when I posted above . The method I mentioned above only works on the front . I apologize on the miss information. .

Sent from my BBF100-2 using Tapatalk


OP
16GoManGoHC2

16GoManGoHC2

3000 Posts Club
Founding Member
9 Second Best E/T
Member ID
#1139
Messages
3,286
Reactions
7,767
Likes
252
City
Nanticoke
State
PA
Country
United States
Vehicle
2016 Challenger He’ll Cat
Thread Starter #48
No problem no harm intended just setting the record straight for those that think this is a easy task, it’s not unfortunately


DRAGRCR

1000 Posts Club
Founding Member
9 Second Best E/T
Member ID
#1181
Messages
1,444
Reactions
4,624
Likes
162
City
Death Valley
State
CA
Country
United States
Vehicle
Hornet
#49
No problem no harm intended just setting the record straight for those that think this is a easy task, it’s not unfortunately
When my Demon broke the rear Diff I had the ford truck studs installed all 20 front and back. The Tech did it at night as a side Job. Would not tell me up front the cost. If you think about it some of the work is already done during the Diff replacement if doing it at the same time. So, I had my fingers crossed. When he was done, he asked me for $150. I handed him $200 cash. I know that would be a hard job for me and take a long time so WELL WORTH IT.


Diboblo

4000 Posts Club
Founding Member
Wiki Contributor
Member ID
#1044
Messages
4,702
Reactions
26,108
Likes
252
City
Riverside
State
CA
Country
United States
Vehicle
2015 Dodge Charger Hellcat!
#50
Installed new DSS Stage 5 axles yesterday along with changing the studs. They don’t come out without removing the hub as some have suggested. Also, the Bolt heads that hold the hub on have a goofy head on them requiring a special E12 socket. The harbor freight ball joint splitter worked GREAT getting the old studs out, recommend tool for $20 it worked great. I ended up using the ARP studs cut to 64 mm under the head which gave me full engagement using a 12 mm spacer on the Racestars and when putting the stock 20’s back on without the spacer original lug nuts had 2 turns left before bottoming.
What a job the first one was, since hub was off puled the E brake shoes off to cleaning things up and learned the hard way the lower alum shoe retaining pin has to go back in BEFORE putting the plate and hub back on, there’s no getting it in after assembly like the top one :(
But now ready for testing :)
View attachment 9026 View attachment 9027 View attachment 9028 View attachment 9029 View attachment 9030 View attachment 9031 View attachment 9032 View attachment 9033 View attachment 9034 View attachment 9035 View attachment 9036
Do you have a source, for the E12 socket you used on the rear hubs?


<EDIT>Scratch that... I see from the pix, what you're getting at. I have a set of E sockets.</EDIT>


Bob
Riverside, California


Last edited:
OP
16GoManGoHC2

16GoManGoHC2

3000 Posts Club
Founding Member
9 Second Best E/T
Member ID
#1139
Messages
3,286
Reactions
7,767
Likes
252
City
Nanticoke
State
PA
Country
United States
Vehicle
2016 Challenger He’ll Cat
Thread Starter #51
When my Demon broke the rear Diff I had the ford truck studs installed all 20 front and back. The Tech did it at night as a side Job. Would not tell me up front the cost. If you think about it some of the work is already done during the Diff replacement if doing it at the same time. So, I had my fingers crossed. When he was done, he asked me for $150. I handed him $200 cash. I know that would be a hard job for me and take a long time so WELL WORTH IT.
You got a steal of a deal there, took me all day (well, one I had to do twice because of that damn pin) Passenger side took half the time once I did it twice on the driver side lol


OP
16GoManGoHC2

16GoManGoHC2

3000 Posts Club
Founding Member
9 Second Best E/T
Member ID
#1139
Messages
3,286
Reactions
7,767
Likes
252
City
Nanticoke
State
PA
Country
United States
Vehicle
2016 Challenger He’ll Cat
Thread Starter #52
Ok, so 52F here yesterday, local test area, concrete bridge over the river, warmed up to a balmy 42F surface temp. Did a 1st gear hit, pulled over checked stud torque ok, no rub, took it up to 140 slowly felt good, went back to the starting gate for a full hit. Unfortunately spin spin spin, felt no different then the Nitto NT05r, couldn’t hook, too cold. Max G’s on launch .76, .78 and .80, high 11 1/4’s 2.162 60’. Went home and put the Nittos back on and see how they did within 1/2 hour of the 3 passes I tried. Launch G’s .80, .82 high 11 passes and about the same 60’. Even though 50 out it’s been 10-20 for a few days roads just too cold. Funny thing ran a 11.87 on the MT’s and a exact 11.87 on the Nitto’s. It’s going to be a long winter waiting on spring for the track to open :)
So at the moment the Nitto’s and the MT’s dead even on street hook on a 42F surface.
BDAFC357-0FE3-4532-A4A9-8DBE3EA2A112.jpeg 62F7BEFA-E418-45C6-B38E-0B1BC81AE11C.jpeg


coolblue

1000 Posts Club
Founding Member
Donating Member
Member ID
#1172
Messages
1,577
Reactions
2,695
Likes
162
City
Long Island
State
NY
Country
United States
Vehicle
2019 Redeye
#53
Maybe you gotta play with air pressure? or compound on M/T's just has to be warmer to be more effective than nitto's ? Hope so, that's a lot of money and effort for no difference.


coolblue

1000 Posts Club
Founding Member
Donating Member
Member ID
#1172
Messages
1,577
Reactions
2,695
Likes
162
City
Long Island
State
NY
Country
United States
Vehicle
2019 Redeye
#54
Maybe you gotta play with air pressure? or compound on M/T's just has to be warmer to be more effective than nitto's ? Hope so, that's a lot of money and effort for no difference.
Also why are u using an external performance device thingy. Is it more accurate than the one incorporated in the car's computer?


OP
16GoManGoHC2

16GoManGoHC2

3000 Posts Club
Founding Member
9 Second Best E/T
Member ID
#1139
Messages
3,286
Reactions
7,767
Likes
252
City
Nanticoke
State
PA
Country
United States
Vehicle
2016 Challenger He’ll Cat
Thread Starter #55
Yea, I like the G-Tech, it uses a 50 Hz GPS unit and is very accurate, I’ve compared it to track timers numerous times and it’s within a few thousandth’s of hard wired sensors. It gives 60’ times and can graphs runs side by side and incorporate G forces into the run so you can see where your loosing time etc. But the cars timers for what they can show are pretty close most times to it but I’ve seen the car timer be off by .2 seconds some times, sometimes fast and sometimes slow so I give car timer a +/- window of .2 seconds, Compared to the Gtech +/- .005
seconds depending on how many satellites it’s tracking. And my Capri has no dash timer of any sort so it has a purpose more then just the cat.


OP
16GoManGoHC2

16GoManGoHC2

3000 Posts Club
Founding Member
9 Second Best E/T
Member ID
#1139
Messages
3,286
Reactions
7,767
Likes
252
City
Nanticoke
State
PA
Country
United States
Vehicle
2016 Challenger He’ll Cat
Thread Starter #56
Had tires down to 24 psi, didn’t have allot of test and tune time and my test area was pretty busy hard to get a clear and open bridge plus I had to get to a viewing and service for a friend who passed last week :(


OP
16GoManGoHC2

16GoManGoHC2

3000 Posts Club
Founding Member
9 Second Best E/T
Member ID
#1139
Messages
3,286
Reactions
7,767
Likes
252
City
Nanticoke
State
PA
Country
United States
Vehicle
2016 Challenger He’ll Cat
Thread Starter #57
TPMS activation. Installed TPMS sensors in the new race stars, used units from summit that where supposed to be compatable with My 16 challenger. Mopar units, but car not picking them up, says SERVICE TIRE PRESSURE SYSTEM or something of that order in the dash display. These units the wrong units or just weren’t set up right when installed?
I knew I should have looked up the ones I bought and used in the 20x10.5 replicas in the spring and got the same ones BE2C14DC-FE77-454D-ACFB-660477FD8D00.jpeg image.jpg :(


Diboblo

4000 Posts Club
Founding Member
Wiki Contributor
Member ID
#1044
Messages
4,702
Reactions
26,108
Likes
252
City
Riverside
State
CA
Country
United States
Vehicle
2015 Dodge Charger Hellcat!
#58
TPMS activation. Installed TPMS sensors in the new race stars, used units from summit that where supposed to be compatable with My 16 challenger. Mopar units, but car not picking them up, says SERVICE TIRE PRESSURE SYSTEM or something of that order in the dash display. These units the wrong units or just weren’t set up right when installed?
I knew I should have looked up the ones I bought and used in the 20x10.5 replicas in the spring and got the same ones View attachment 9228 View attachment 9229 :(
Disconnect the battery for a few, then put some miles on the car.

Bob
Riverside, California


DRAGRCR

1000 Posts Club
Founding Member
9 Second Best E/T
Member ID
#1181
Messages
1,444
Reactions
4,624
Likes
162
City
Death Valley
State
CA
Country
United States
Vehicle
Hornet
#59
TPMS activation. Installed TPMS sensors in the new race stars, used units from summit that where supposed to be compatable with My 16 challenger. Mopar units, but car not picking them up, says SERVICE TIRE PRESSURE SYSTEM or something of that order in the dash display. These units the wrong units or just weren’t set up right when installed?
I knew I should have looked up the ones I bought and used in the 20x10.5 replicas in the spring and got the same ones View attachment 9228 View attachment 9229 :(
I am not a big fan of battery disconnects. Besides I have never had to do that. All I can say is when a complete set of new sensors is installed it might take 20 minutes of driving to connect. So do 30 just to be sure. Once the car learns them they will connect sooner next time you switch them out. Car can learn and store 2 sets I think. Try hitting OK on the steering wheel. Go to tire shop and ask them to diagnose and wake them up. They have a device that will query the sensor. But the newer ones do not need to be woken up or reset. It's plug and play. But they can at least tell you if the batteries are dead etc.


OP
16GoManGoHC2

16GoManGoHC2

3000 Posts Club
Founding Member
9 Second Best E/T
Member ID
#1139
Messages
3,286
Reactions
7,767
Likes
252
City
Nanticoke
State
PA
Country
United States
Vehicle
2016 Challenger He’ll Cat
Thread Starter #60
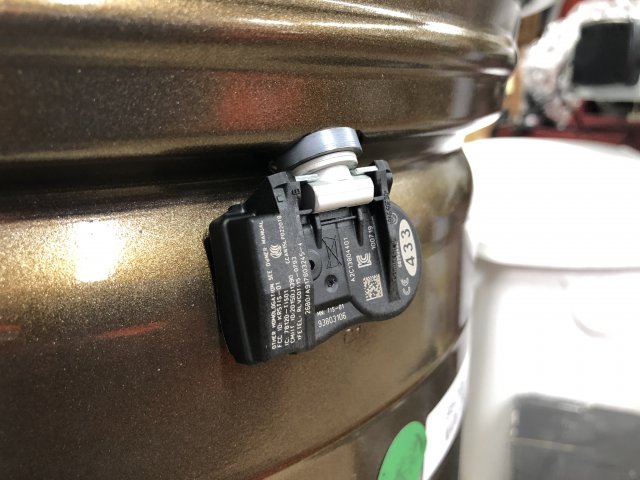
Drove them around for a good while, i thought they where connected at they read 32 psi when 35 was in them but then went blank after about 10 mikes and never came back. Put the Nitto’s on and it read them before I left the drive way. There’s 8 of them in my garage pretty close to the car, 2 fronts which are original, 2 on original rims with 275 MT Street SS on them, 2 in the replica Nitto rims and these 2 new ones in the race stars. That was my thought too, take them to where I had them mounted and see if they get a reading from them. They where brand new, do they have to have a tab pulled on them to connect their battery or any thing??


Top