
- Member ID
- #1296
- Messages
- 79
- Reactions
- 160
- Likes
- 27
- City
- LIBRARY
- State
- CO
- Country
- United States
This Wiki is for those who wish to modify their M6 Barton shifter to reduce the effort required to get into the 5th/6th gates. This change is fairly straight forward and simple to do, if the shifter has not yet been installed in the vehicle or is removed to allow for it to be done. While I have not investigated the possibility of making the modification while it is installed, I believe it to be impossible, certainly without at least disconnecting much of the installation to the point where you might as well remove it anyway.
While your reasons might vary for doing this modification, the reason that I had for making the change was that while some (most?) M6 drivers who are using their Barton shifters during "performance" driving never make it out of 4th gear, for those who participate in "Standing Mile" speed-trials or even longer events such as a standing two-mile event, 5th gear, and sometimes 6th gear are very real shifts! Some argue that 6th is even more important than 5th, and the “stock’ Barton can be challenging, especially under the stress of competition.
For those M6 drivers who are participating in 1/4mile drags, this may not be a worthwhile modification, unless you’re either running higher HP motors, and/or have changed from the 3.70 factory differential to the 3.90’s, either of which may put you into that strange shift out of 4th at the very end of your race, which is your issue to deal with and not meant to be debated here, this Wiki only helps you if you’ve made the choice to make that shift.
As I stated earlier, this modification isn’t especially challenging, with the assumption that you’re mechanically inclined, have a certain amount of finesse and assume the risk and responsibility of modifying an otherwise excellent product to suit your particular driving style. You know how it goes, I assume no responsibility for your choice to implement this modification. I certainly assume no responsibility for your quality of work, your QA abilities or your particular shifter’s characteristics. (I really mean this, I’m not just blowing smoke…)
=====================================================
TOOLS NEEDED:
=======================================================
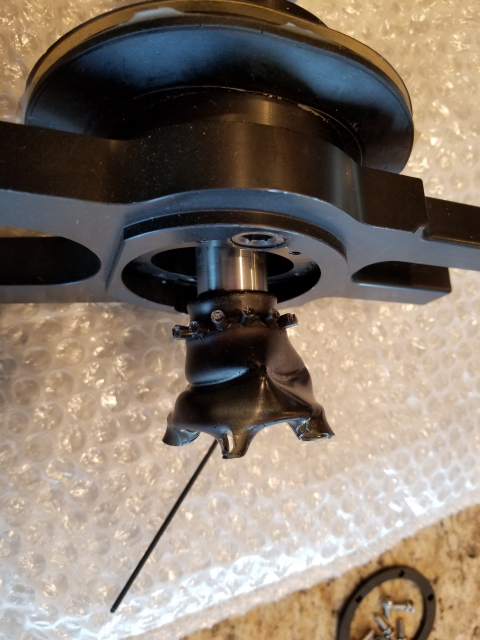
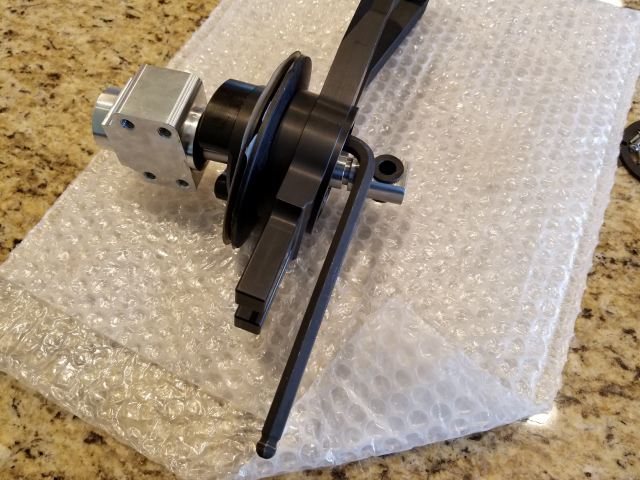
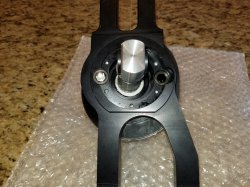
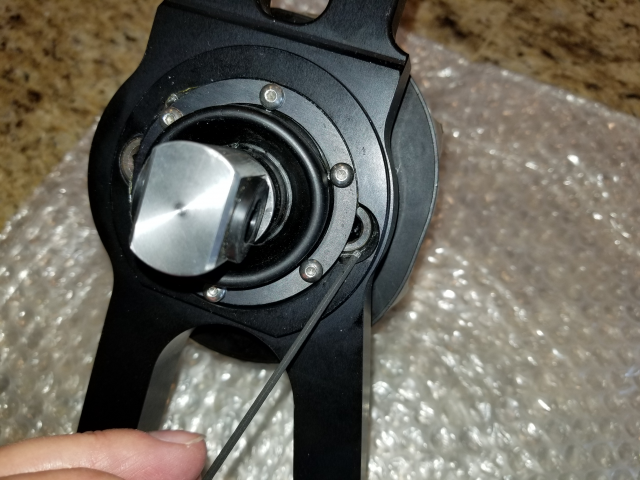
View of the bottom of the Barton shifter -
Transmission forks are at the bottom of the picture.
Bushing forks are at the top of the picture.
Shift handle oriented away, transmission link with bushing pointing towards you.
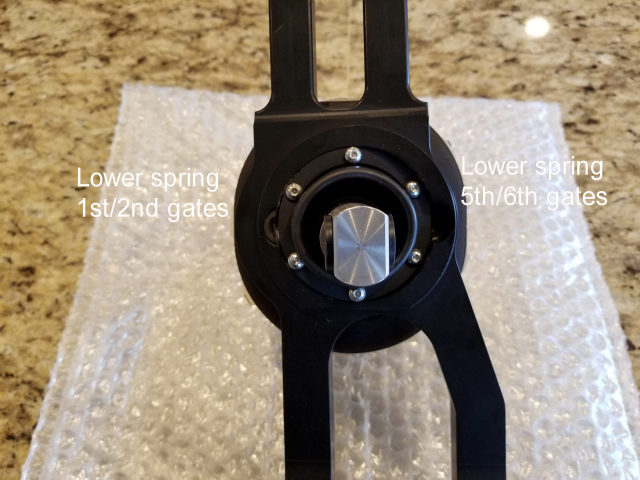
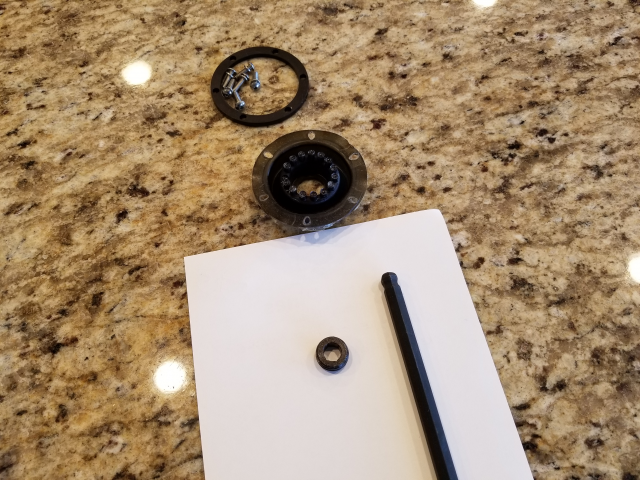
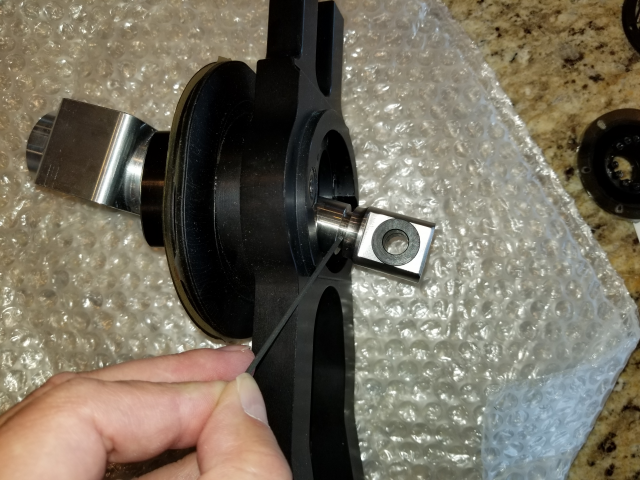
Remove 6 button-head socket screws (5/64" hex) and set aside...
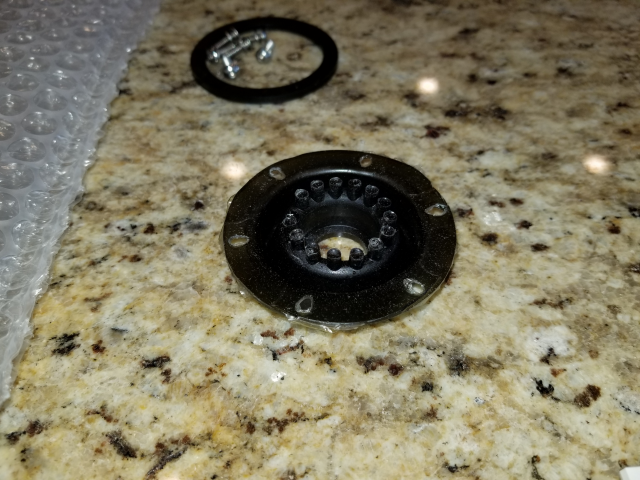
Next remove boot retainer ring washer and set aside as well...
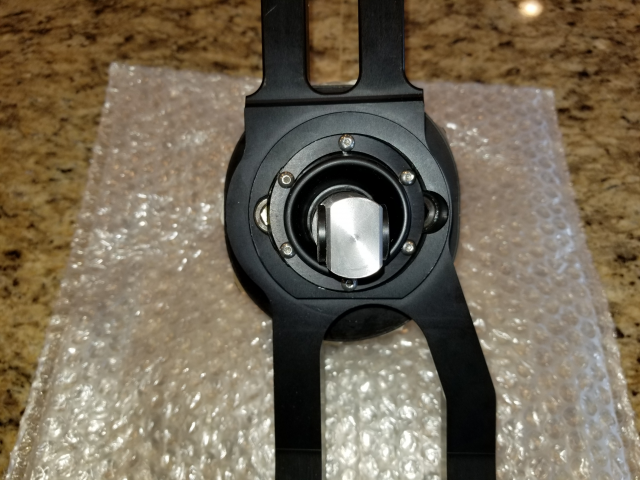
Fold back lower boot and carefully remove, do not tear boot, this boot serves more than protection, and is functional to the behavior of the shifter!
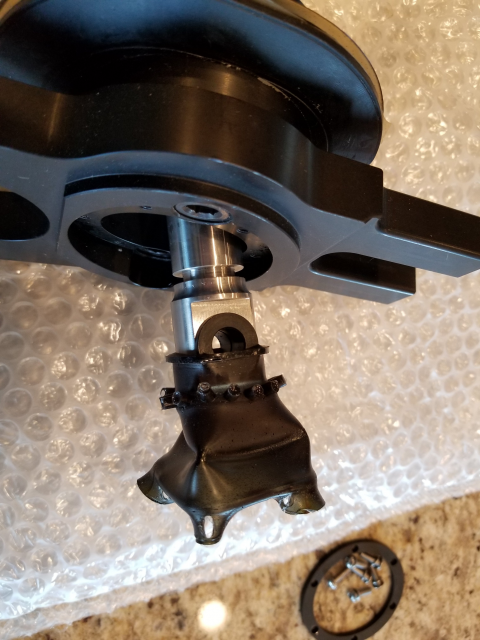
Set boot aside.
=====================================================
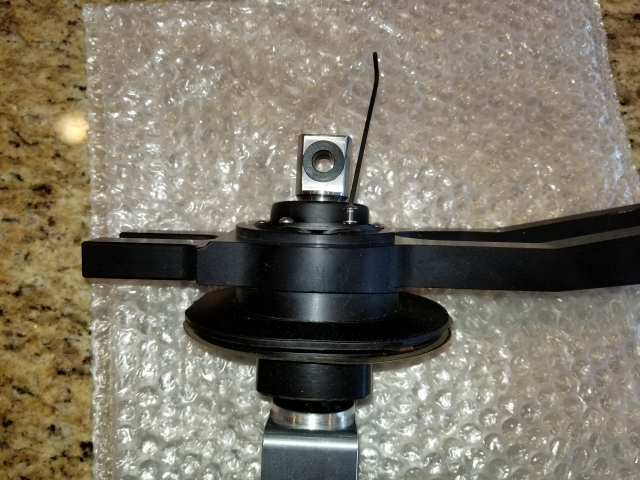
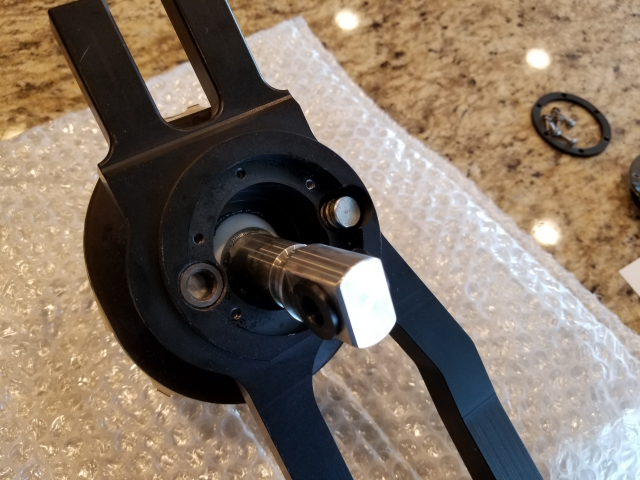
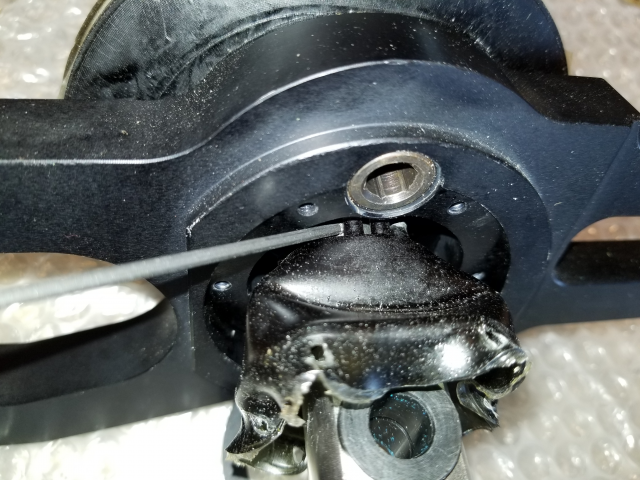
Next you'll remove the spring retaining screw (5/16" hex). This is a hollow set-screw. Normally the spring keeper sets tightly against this screw and prevent ingress of water into the shifter, once you remove the spring, water can get into the shifter, this is why you'll later seal this hole with RTV sealant.
In this first image, the shifter has been laid over on its right side relative to the first images and I'm pointing at the 5th / 6th gear lower spring set-screw. Notice how the bottom of the shifter has an angle to it and this side is deeper in the relief.
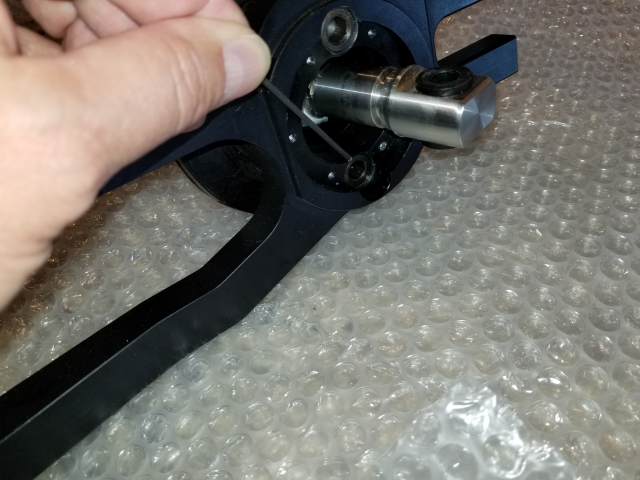
Remove set-screw and set aside...
(While not significant, you are relieving a spring with some amount of force...)
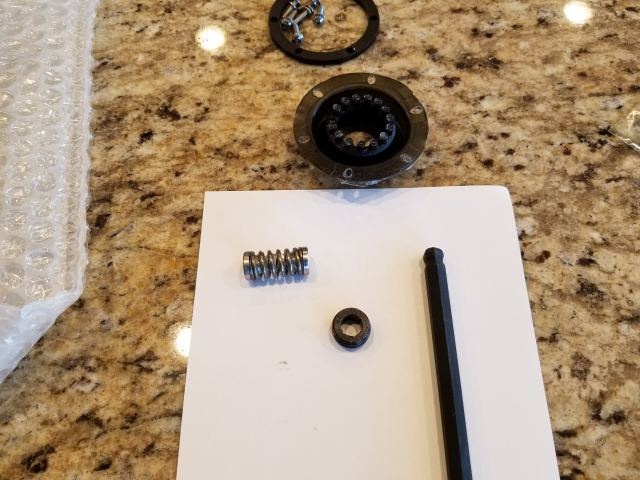
Next, orient shifter upright such that the spring can fall out of the counter-bore.
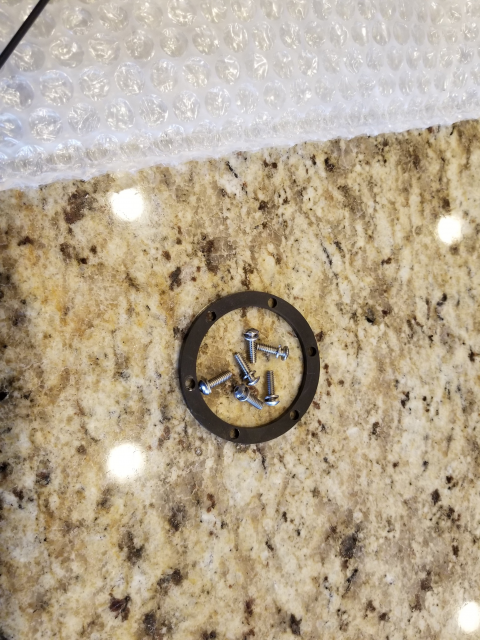
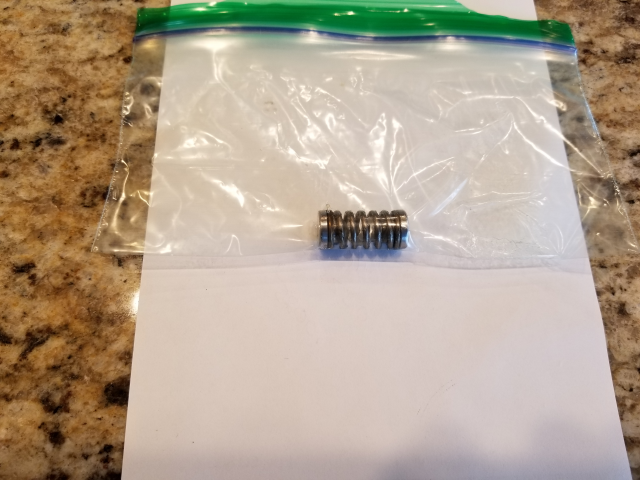
Ensure that ALL THREE PIECES COME OUT! There are two keepers and the spring.
(Sometimes the upper keeper sticks up in the top of the hole due to the grease on it.)
Reinstall the hollow 5/16th set-screw, apply a small amount of 242 Loctite (blue) or equivalent.
Don't be the person that floods the screw with Loctite, you do not want to contaminate the ball on the shaft with Loctite!
The set-screw will bottom out nicely at the bottom of its threads, tighten securely.

This picture shows the now open hole into the internals of the Barton shifter...
=================================================================
Now you're ready to reinstall the lower boot. Remember that this boot serves more than just protection for the shifter.
This groove is where the boot needs to set, install boot slowly and carefully so that you don't tear it on the bushings.
Orient (twist) boot such that the holes line up... I'm having to hold the stick in such a way that the boot isn't wrinkled by the springs trying to center the shifter.

Sometimes these nipples (indicated by the small hex-key) get caught up and cause the boot to not sit naturally, ensure that they are arranged neatly around the shaft...
Reinstall boot retainer ring washer and button head cap screws, apply SMALL amount of Loctite to the HOLE, not the screw.
Again, you don't want the Loctite anywhere but on the threads, you also don't want so much on there that you can't change your mind in the future. (You might consider using 222 Loctite here (purple))
Tighten evenly and tightly, the lock-washer should be fully compressed but not so tightly that the boot is made to "extrude" from under its ring.
Save spring and keepers in a bag and in a safe place in case you want to put it back...
====================================================
Lastly, you need to seal up the hole created by removing the spring (and its keepers).
Use RTV sealant (any automotive grade should do fine...) I've used both the "black" oil type and the "red" high-temp stuff...
You want to apply it such that it adequately seals the hole but does not go beyond the hollow set-screw.
I strongly recommend allowing this to dry overnight or until fully cured, as much for the reason on not risking getting it somewhere on your Hellcat interior as anything else.
While your reasons might vary for doing this modification, the reason that I had for making the change was that while some (most?) M6 drivers who are using their Barton shifters during "performance" driving never make it out of 4th gear, for those who participate in "Standing Mile" speed-trials or even longer events such as a standing two-mile event, 5th gear, and sometimes 6th gear are very real shifts! Some argue that 6th is even more important than 5th, and the “stock’ Barton can be challenging, especially under the stress of competition.
For those M6 drivers who are participating in 1/4mile drags, this may not be a worthwhile modification, unless you’re either running higher HP motors, and/or have changed from the 3.70 factory differential to the 3.90’s, either of which may put you into that strange shift out of 4th at the very end of your race, which is your issue to deal with and not meant to be debated here, this Wiki only helps you if you’ve made the choice to make that shift.
As I stated earlier, this modification isn’t especially challenging, with the assumption that you’re mechanically inclined, have a certain amount of finesse and assume the risk and responsibility of modifying an otherwise excellent product to suit your particular driving style. You know how it goes, I assume no responsibility for your choice to implement this modification. I certainly assume no responsibility for your quality of work, your QA abilities or your particular shifter’s characteristics. (I really mean this, I’m not just blowing smoke…)
=====================================================
TOOLS NEEDED:
- 5/64” HEX KEY/ALLEN WRENCH
- 5/16” HEX KEY/ALLEN WRENCH
- LOCTITE 242 (BLUE) or LOCTITE 222 (PURPLE)
- RTV SEALANT
- 10-15 MINUTES (FOR MODIFICATION)
- OVERNIGHT (TO ALLOW RTV SEALANT TO CURE)*
- *If you allow the RTV to “skin” over and you proceed carefully, you may elect to skip this drying time, YOUR choice.
- The Barton shifter has 4 springs that control the “return to center force” of the stick. 2 are responsible for the 1st/2nd gates and 2 are responsible for the 5th/6th gates, you will remove 1 of the 2 springs (lower spring), thereby reducing the return to center force by approximately 50%. The hole left by removing the spring (and its “keepers”) will be filled by RTV sealant to prevent water and road grime from entering the Barton shifter.
=======================================================
View of the bottom of the Barton shifter -
Transmission forks are at the bottom of the picture.
Bushing forks are at the top of the picture.
Shift handle oriented away, transmission link with bushing pointing towards you.
Remove 6 button-head socket screws (5/64" hex) and set aside...
Next remove boot retainer ring washer and set aside as well...
Fold back lower boot and carefully remove, do not tear boot, this boot serves more than protection, and is functional to the behavior of the shifter!
Set boot aside.
=====================================================
Next you'll remove the spring retaining screw (5/16" hex). This is a hollow set-screw. Normally the spring keeper sets tightly against this screw and prevent ingress of water into the shifter, once you remove the spring, water can get into the shifter, this is why you'll later seal this hole with RTV sealant.
In this first image, the shifter has been laid over on its right side relative to the first images and I'm pointing at the 5th / 6th gear lower spring set-screw. Notice how the bottom of the shifter has an angle to it and this side is deeper in the relief.
Remove set-screw and set aside...
(While not significant, you are relieving a spring with some amount of force...)
Next, orient shifter upright such that the spring can fall out of the counter-bore.
Ensure that ALL THREE PIECES COME OUT! There are two keepers and the spring.
(Sometimes the upper keeper sticks up in the top of the hole due to the grease on it.)
Reinstall the hollow 5/16th set-screw, apply a small amount of 242 Loctite (blue) or equivalent.
Don't be the person that floods the screw with Loctite, you do not want to contaminate the ball on the shaft with Loctite!
The set-screw will bottom out nicely at the bottom of its threads, tighten securely.
This picture shows the now open hole into the internals of the Barton shifter...
=================================================================
Now you're ready to reinstall the lower boot. Remember that this boot serves more than just protection for the shifter.
This groove is where the boot needs to set, install boot slowly and carefully so that you don't tear it on the bushings.
Orient (twist) boot such that the holes line up... I'm having to hold the stick in such a way that the boot isn't wrinkled by the springs trying to center the shifter.
Sometimes these nipples (indicated by the small hex-key) get caught up and cause the boot to not sit naturally, ensure that they are arranged neatly around the shaft...
Reinstall boot retainer ring washer and button head cap screws, apply SMALL amount of Loctite to the HOLE, not the screw.
Again, you don't want the Loctite anywhere but on the threads, you also don't want so much on there that you can't change your mind in the future. (You might consider using 222 Loctite here (purple))
Tighten evenly and tightly, the lock-washer should be fully compressed but not so tightly that the boot is made to "extrude" from under its ring.
Save spring and keepers in a bag and in a safe place in case you want to put it back...
====================================================
Lastly, you need to seal up the hole created by removing the spring (and its keepers).
Use RTV sealant (any automotive grade should do fine...) I've used both the "black" oil type and the "red" high-temp stuff...
You want to apply it such that it adequately seals the hole but does not go beyond the hollow set-screw.
I strongly recommend allowing this to dry overnight or until fully cured, as much for the reason on not risking getting it somewhere on your Hellcat interior as anything else.